
What's an Employee Profile?
It's a file containing the details and work policies that apply to an individual
employee.
Setting up employees' profiles is the last step in preparing your software to be used. When you set up an employee, you'll tell the software the employee's name and choose from the shifts, Pay Types and overtime and holiday schedules you set up earlier. This is also where you assign iButtons to employees and/or issue them their four-digit User ID, which allows them to clock in without an iButton.
You'll create your Employee Profiles in the Setup Wizard, which appears the first time you start your TimePilot software. You can edit your Employee Profiles or add or delete an Employee Profile by clicking on the Setup menu in TimePilot Central and choosing "Profile Setup... ." To edit or delete an Employee Profile, click on the name of the employee and then the appropriate button. To create an Employee Profile, click the "Add a Profile" button.
The instructions below are keyed to the screenshot above.
![]() Enter the employee's name in the box at the top. Entering the last name first ensures that employees' names will appear in
alphabetical order on reports. Make sure the box next to "Active" is checked. When this box is checked, the
employee is able to use the TimePilot system. If it's not checked, the employee cannot use the system and no
transactions will be generated. Inactive employees will not be a part of the current pay period and
will not appear on reports.
Enter the employee's name in the box at the top. Entering the last name first ensures that employees' names will appear in
alphabetical order on reports. Make sure the box next to "Active" is checked. When this box is checked, the
employee is able to use the TimePilot system. If it's not checked, the employee cannot use the system and no
transactions will be generated. Inactive employees will not be a part of the current pay period and
will not appear on reports.
![]() TimePilot
Vetro has a screen that displays the employee's name
when he or she clocks in. If you have Vetro, enter what you want
the screen to display. The entry is limited to 15 characters because that's
the width of the screen.
TimePilot
Vetro has a screen that displays the employee's name
when he or she clocks in. If you have Vetro, enter what you want
the screen to display. The entry is limited to 15 characters because that's
the width of the screen.
![]() Choose the employee's
location,
Company,
Shift,
Department,
Pay Type and
Holiday Schedule from the drop-down boxes.
Choose the employee's
location,
Company,
Shift,
Department,
Pay Type and
Holiday Schedule from the drop-down boxes.
![]() Will
this employee have the Auto Lunch
function applied to his or her schedule? If so, make sure there's a check in the
checkbox and set the number of minutes that will be subtracted from their time
for their lunch break. Note: Auto Lunch also needs to be set up in the
Administrative menu
in TimePilot Central before it can be used.
Will
this employee have the Auto Lunch
function applied to his or her schedule? If so, make sure there's a check in the
checkbox and set the number of minutes that will be subtracted from their time
for their lunch break. Note: Auto Lunch also needs to be set up in the
Administrative menu
in TimePilot Central before it can be used.
![]() Will this employee clock in with an
ID number or an iButton?
If your TimePilot timeclock doesn't have a keypad, you have no choice: you have
to use iButtons. If you have both a keypad and iButton probes (round, silver
sensors about the size of a quarter) on your clock, you can use either method,
or even "mix and match": have some employees clock in with an ID number and some
with iButtons. If your clock has no probes, you'll need to use ID numbers.
Will this employee clock in with an
ID number or an iButton?
If your TimePilot timeclock doesn't have a keypad, you have no choice: you have
to use iButtons. If you have both a keypad and iButton probes (round, silver
sensors about the size of a quarter) on your clock, you can use either method,
or even "mix and match": have some employees clock in with an ID number and some
with iButtons. If your clock has no probes, you'll need to use ID numbers.
 Note:
Users of TimePilot PC can purchase the optional
iButton Receptor (shown at
right), which plugs into your computer's USB port and allows the use of
iButtons.
Note:
Users of TimePilot PC can purchase the optional
iButton Receptor (shown at
right), which plugs into your computer's USB port and allows the use of
iButtons.
Here's how to set up each method:
![]() If you plan to use Snap-To and/or Late/Early Tracking, make sure there's a check in the appropriate checkbox. For details on Snap-To, click
here and
here; for details on Late/Early Tracking, click
here.
If you plan to use Snap-To and/or Late/Early Tracking, make sure there's a check in the appropriate checkbox. For details on Snap-To, click
here and
here; for details on Late/Early Tracking, click
here.
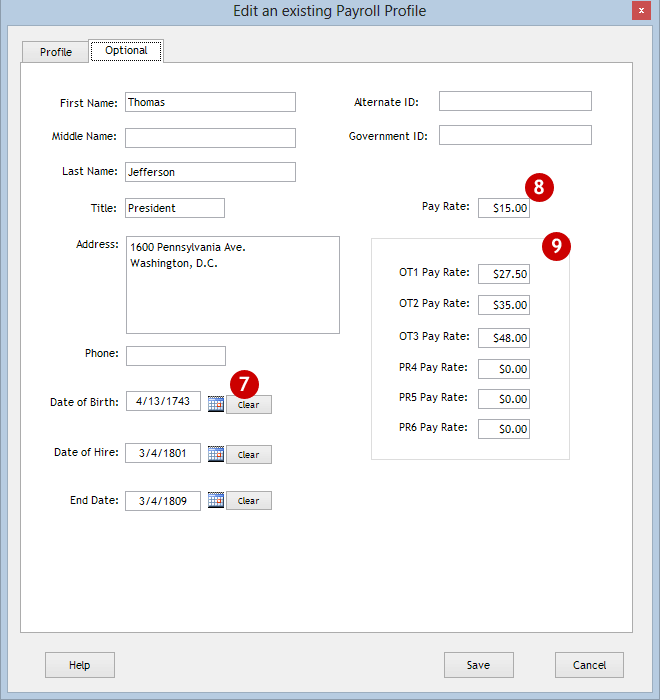
Fill in as much or as little information on this screen as you wish.
![]() If your company treats employees' birthdays as holidays, make sure you enter a birthdate here so the software knows when the employee should receive that
holiday. For more on holidays, click here.
If your company treats employees' birthdays as holidays, make sure you enter a birthdate here so the software knows when the employee should receive that
holiday. For more on holidays, click here.
![]() If
you enter an hourly wage here, you'll be able to see the employee's total gross
pay when you generate some selected reports.
If
you enter an hourly wage here, you'll be able to see the employee's total gross
pay when you generate some selected reports.
![]() If
you don't want to use the traditional multiplier for overtime—time and a half
or double-time—you can set exact pay rates here. For more information and
instructions on how to set up this function, click
here.
If
you don't want to use the traditional multiplier for overtime—time and a half
or double-time—you can set exact pay rates here. For more information and
instructions on how to set up this function, click
here.
When you're done, click "Save." Repeat the process for each employee.