Getting Started
Using Clock Manager with the Cloud
You've set up TimePilot clocks at your Local and Remote sites to work with the Cloud; now how do you use them?
Here are some examples.
Example 1
Let's start with the simplest example: Your Local site. You have no Remote site; the only device using the cloud here is the TimePilot Smartphone app on Bill's iPhone.
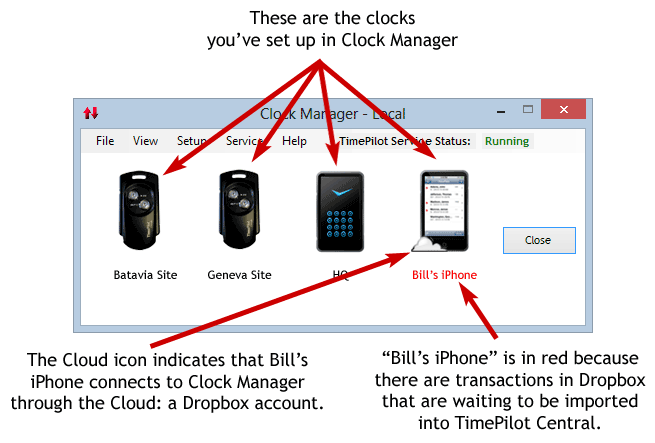
Here's how data from each clock is handled:
- Extreme clocks: Data on the two clocks is downloaded to a USB drive and then imported into the TimePilot database as soon as the USB drive is plugged into the computer.
- Vetro clock: It's on the company's local area network, so because the TimePilot Service is running, as soon as an employee clocks in or out, the data is sent to the database. If the clock was in Standalone Mode, you'd collect the clock-ins and clock-outs on the USB drive. They would be imported into the TimePilot database as soon as the USB drive is plugged into the computer.
- iPhone App: Importing from the App is not automatic; first, the iPhone user must export his or her transactions by tapping "Send to TimePilot Central" on their iPhone to get the data to the Cloud. When the transactions arrive in Dropbox, the name of the iPhone will change from black to red in Clock Manager, to indicate that there are transactions waiting to be imported. To import them into the TimePilot database, the user at headquarters must right-click the image of the phone in Clock Manager and choose "Get Transactions from Phone" from the pop-up menu.
- It's not shown in this example, but data collected by any TimePilot Tap clocks would automatically be imported into the TimePilot database when the Tap clock was connected to the PC with its USB cable. In addition, data collected by TimePilot PC would also automatically be imported.
Example 2
This example is a little more complex: You have three clocks at headquarters and two clocks at a Remote site (Andover) that use the Cloud to link to your database.
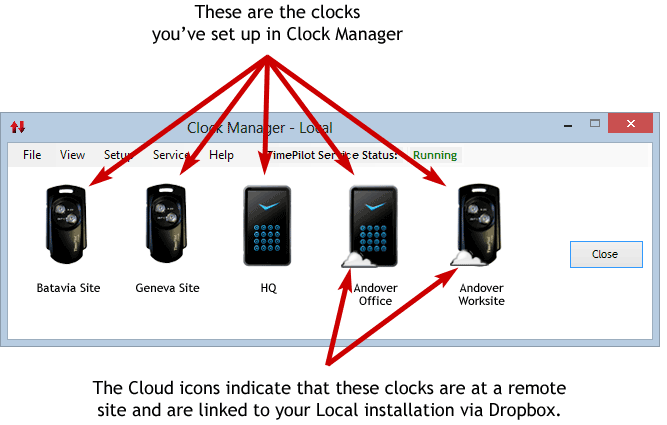
- The two Local Extreme clocks (Batavia Site and Geneva Site) have their data downloaded to the TimePilot database as soon as their USB drives with the data are plugged into a USB port of the computer holding the database.
- The Local Vetro clock (HQ) is used in Standalone Mode, and when the USB drive containing data collected from the clock is plugged into the PC, the data is automatically downloaded into the database. If the HQ clock was in Network Mode and the TimePilot Service was running, as employees clock in and out the data would be transmitted automatically through the network to the database.
- The Andover Office and the Andover Worksite clocks are located at a Remote Site a thousand miles away.
- If the Andover Office clock (a Vetro) is in Network Mode and the TimePilot Service is running on the PC at the Remote site, as employees clock in and out the data will be transmitted automatically to the Cloud and down to the database at the Local site.
- If the clock is used in Standalone Mode, when the USB drive containing data collected from the clock is plugged into the PC, the data will be transmitted automatically up to the Cloud and down to the database at the Local site.
Suppose you're at your Local site, waiting for the supervisors at your remote sites to send you their data. Is there any simple way to see whether they've uploaded their data to the Cloud?
Yes, but you'll need to tell TimePilot Service not to collect the data from Remote sites automatically. To do this, click the "Service" menu in Clock Manager, then click "Enable Service to automatically collect data from the Cloud." You'll know it's been turned off when there is no checkmark next to the menu item.
In the example below, there are three Remote clocks that are sending data to you: Andover Office, Andover Worksite and Denver Staff. It's almost time to do payroll, and you want to make sure that all three supervisors at the remote sites have sent in their data.
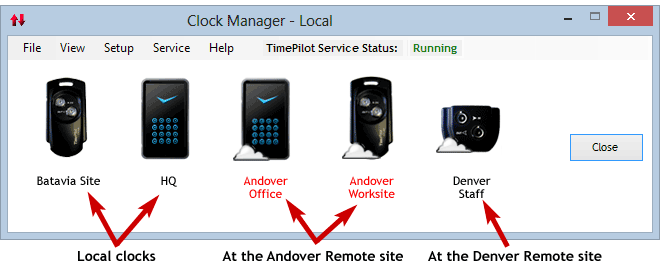
In this screenshot, you can see the three Remote clocks in Clock Manager (as well as two Local clocks, Batavia Site and HQ).
The names of the Andover Office and the Andover Worksite are in red, while the Denver Staff is in black. The red text indicates that there's data from Andover Office and Andover Worksite waiting in the Cloud, ready to be imported. The black text indicates there isn't any data from the Denver Staff. You call the Denver supervisor, remind him or her that you need the data, and a few minutes later "Denver Staff" turns red. The data is ready.
Now you'll want to import it into the database. All you have to do is right-click a Remote clock and click "Get Transactions" from the pop-up menu that appears. When the transfer is complete, the name of the clock will return to black. Repeat the process for the other two Remote clocks and you're done.