Using the System
Closing Out a Pay Period
 You've set up your clocks and your software,
assigned your employees their
iButtons and started collecting their clock-ins and clock-outs.
Now the pay
period has ended and it's time to collect your data and get it ready for
payroll. This is where the TimePilot software really shines.
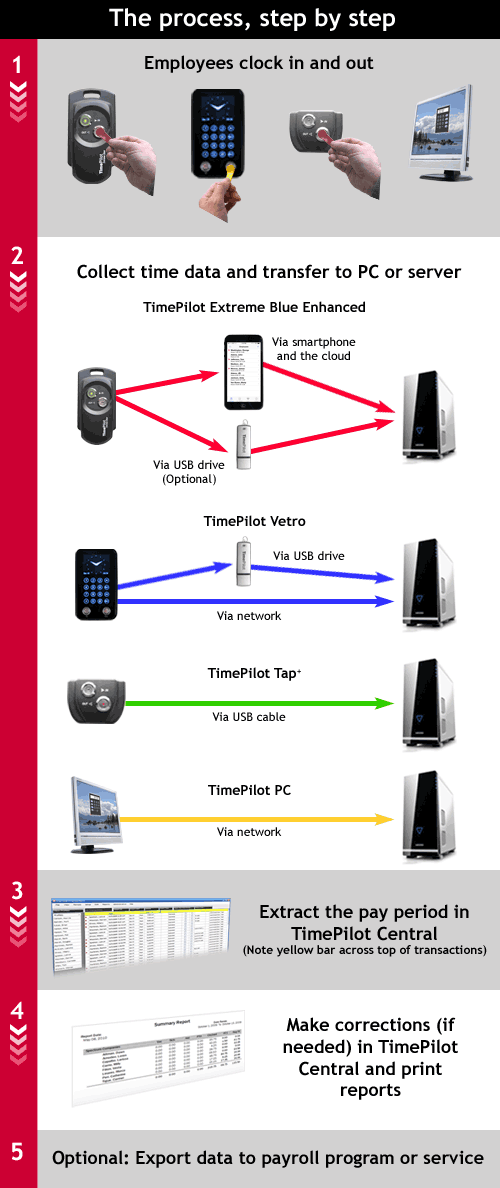
Here's how it works: When your pay period has ended
and it's time to process your payroll, you use TimePilot Central to take,
or "extract," all the
transactions that
occurred during that time and place them in a separate file (database).
The process of extracting not only moves the transactions that occurred
during this pay period into a new database, it also copies your current employee
profiles, pay types, etc. into the this database. This "snapshot" preserves your
setup information so that when you review this pay period in the future it will
reflect the way things were at that time, and not show any changes made since
then.
Make any corrections that weren't made during the pay period—if, for instance, an employee forgot
to clock in or out—and add
transactions for vacations, holidays, etc., to create a complete record of
each employee's workweek.
Then you can create and print reports for further review. Optionally, you
can "export" the file to your payroll service or accounting software.
Note: You can also export your data to a spreadsheet (.xls format, commonly used by
Microsoft Excel) or word processing document (.doc, commonly used by Microsoft
Word, or .rtf, Rich Text Format). In addition, you can print your data or create a PDF
version of the data with TimePilot's built-in tools. For more, see the page on
Reports.
Getting ready for payroll,
step by step
- Start TimePilot Central.
- Extract your pay period. (Click on "Periods" in the menu bar, then select "Extract Pay Period.")
- You'll be asked if you want to back up your
Current Transactions. Click "Yes" and follow the instructions.
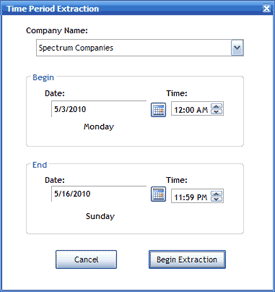
- In the pay period extraction box (below right), choose the company whose pay period you want to extract
from the drop-down list at the top.
- Choose the beginning and ending of the pay period.
- Click "Begin Extraction."
- Once the extraction is complete, the header across the top
of the Transaction List will change from
green to yellow,
indicating that you are now looking at the extracted data and
not Current Transactions.
- Correct any employee transactions that are erroneous, using the
Quick
Buttons across the top of the screen. Names in red in the
employee list down the left side of the screen indicate trouble spots that
the TimePilot software has
identified. (For more on this topic, click
here.)
It's a good idea to also look over each employee's transactions
to verify that they make sense.
For instance, if an employee clocks in at 8 a.m. on Tuesday, forgets to
clock out that night and also
forgets to clock in Wednesday morning, but clocks out Wednesday night, the
TimePilot software sees a
clock-in followed by a clock-out and will not flag the error, unless you set
the Alerts
feature to flag excessive amounts of time.
-
 Insert transactions for vacations, sick days, paid time off and
bereavement time, if necessary. This is
done manually. The simplest way to do this is to click on the employee's
name, then on the "Edit" menu and choose "Insert Amount of Time." Enter the
date and amount of time the employee is entitled to and click "OK." (For
more on this topic, click
here.)
-
Generate a report. Click "Reports" in the menu bar, then
choose your report. ("Summary Report" is the most common choice.)
If you want a printed copy of the report, click the "Print" button on the
left side of the Reports screen. If you want an electronic copy of the
report that can be saved or e-mailed, click the "Export" button at the left
side of the screen and choose your file format. You can choose from six
different formats: Crystal Reports (.rpt), Adobe Acrobat (.pdf), Microsoft
Excel (.xls), Microsoft Excel Data Only (.xls), Microsoft Word (.doc), or
Rich Text Format (.rtf). When you're done, close the Reports screen to
return to TimePilot Central.
- Optional:
Export your data to your payroll software or service. The TimePilot.com web site has available for download many exports that will convert TimePilot data into a format that can be read by leading payroll services and software packages, like QuickBooks or ADP. Click here to see how to install the export for your service or software. To use an export, here's the general procedure (see the instructions that came with your particular export for details):
- Click "File" on the menu bar, then "Export to payroll software."
- Choose the format for your payroll or accounting program. If that option doesn’t appear in the menu, you probably haven’t installed any formats. Click here for details.
- Enter the required information (available from your payroll service or software manual) and click
"Export" to create a file that can be imported into your software or e-mailed to your payroll service.
 You've set up your clocks and your software,
assigned your employees their
iButtons and started collecting their clock-ins and clock-outs.
Now the pay
period has ended and it's time to collect your data and get it ready for
payroll. This is where the TimePilot software really shines.
  Insert transactions for vacations, sick days, paid time off and
bereavement time, if necessary. This is
done manually. The simplest way to do this is to click on the employee's
name, then on the "Edit" menu and choose "Insert Amount of Time." Enter the
date and amount of time the employee is entitled to and click "OK." (For
more on this topic, click