TimePilot Best Practices
Job Costing with TimePilot Time and Attendance Systems
© TimePilot Corporation, all rights reserved.
Your TimePilot Professional or Enterprise Edition software can also be used for keeping track of the time taken by
particular jobs. Commonly known as "job costing," this feature can be used to
determine the amount of time an individual project takes during the workday or
how long an employee takes to complete a particular project.
Let’s say you run a remodeling company and use TimePilot Extreme Blue
Enhanced. In a single
shift, your employees might be doing framing, then putting up drywall, then
painting—and one employee might be doing some plumbing, too. TimePilot’s job
costing feature allows you to see how each employee spent his or her day and
also to determine how much time all employees spent framing, drywalling,
painting and plumbing.
 To do this, each employee will carry a black iButton and several colored ones.
The black iButton will be used to clock in and out at the start and the end of
the day for payroll purposes; the colored iButtons will be used to record the
start time and end time of particular jobs or tasks. For instance, when an
employee starts framing, he or she would tap their yellow iButton to the "in"
probe. When finished, they would tap the yellow iButton to the "Out" probe, then
tap their red iButton to the "In" probe to indicate they are starting
drywalling.
To do this, each employee will carry a black iButton and several colored ones.
The black iButton will be used to clock in and out at the start and the end of
the day for payroll purposes; the colored iButtons will be used to record the
start time and end time of particular jobs or tasks. For instance, when an
employee starts framing, he or she would tap their yellow iButton to the "in"
probe. When finished, they would tap the yellow iButton to the "Out" probe, then
tap their red iButton to the "In" probe to indicate they are starting
drywalling.
Here’s an explanation of how a remodeling company with four employees—Ben, John,
Mary and Tom—already using TimePilot for payroll purposes would use the system
to keep track of the time their employees spend in framing, drywalling, painting
and plumbing.
Setting things up
- Using TimePilot Central, create a second company in TimePilot (Setup >
Company Setup…) and call it "Costing." The company you created when you first
installed the software, which is probably named after your business, will
continue to track employee hours based on when employees use their black
iButtons; you’ll use the second company, Costing, to track job costing hours. If
you want exact times for each job, make sure you don’t turn on Rounding.
- Next, create four departments in TimePilot Central (Setup > Department
Setup…): Framing, Drywall, Painting and Plumbing.
- Add a new Pay Type (Setup > Pay Type Setup…). Call it "Costing" and click the
button to put the users on an hourly basis. Click the "No" button for each of
the remaining questions. Doing this will prevent the job costing time collected
by the system from being affected by any rules like overtime or vacation pay.
- Now you’ll add "employees"—we’ll call them "users" here to differentiate them
from your workers—to your new company (Setup > Profile Setup…). The first four
users will be "Ben: Framing," "John: Framing," "Mary: Framing" and "Tom:
Framing." For each user, choose Costing as the company and as the pay type and
Framing as the department. Assign a yellow iButton and a four-digit ID number to
each. We suggest that the first two digits represent the task and the last two
represent the employee.
- The next four users will be "Ben: Drywall," "John: Drywall," "Mary: Drywall"
and "Tom: Drywall." You’ll add them to the Costing company and pay type as well
as the Drywall department. Assign each a red iButton and another four-digit ID
number using the suggested code in the previous step.
- Repeat the steps above until each worker’s name (example: "Ben: Painting" and
"Ben: Plumbing") has been assigned to each of the four departments. You could
use green iButtons for Painting and purple iButtons for Plumbing. Each worker
will end up with five iButtons: black, yellow, red, green and purple.
- That completes the setup. Below is a screenshot of TimePilot Central with the
employees set up. (To get this view, we clicked the black "View Profiles" button
at the top of the TimePilot Central Screen.)

Using the system
Your employees have a choice of using iButtons or four-digit ID numbers to
operate the system.
With iButtons
With TimePilot time and attendance products that use the iButton, employees
clock in for the day with their black iButtons, and then after being assigned
their first task of the day, clock in for that job with the appropriate colored
iButton. When they’re finished with the job and are moving to another task, they
clock out of the first job and clock in the second with the appropriately
colored iButton. When the workday is done, they clock out of their last job with
the appropriately colored iButton and then clock themselves out for the day with
their black iButton.
With four-digit ID numbers
If you’re using TimePilot Vetro without iButtons or TimePilot PC, employees
clock in for the day with their Employee ID, and then after being assigned their
first task of the day, clock in for that job with the appropriate ID number you
set in Step 3 above. If you followed the suggestion in Step 3, the first two
digits each employee enters will vary with the job, but the last two he or she
enters will always be the same because they represent the employee himself or
herself. When they’re finished with the first job and are moving to another
task, they clock out of the first job and clock in for the second with the
appropriate ID number. When the workday is done, they clock out for their last
job with the appropriate ID number and then clock themselves out for the day
with their own ID number.
We suggest posting a notice at the timeclocks to remind workers which color
iButton or which ID number stands for which task.
Analyzing the data
To see your job costing data, you’ll first need to start TimePilot Central and
run a report. You can use the data in Current Transactions or in an extracted
pay period. Please see the TimePilot User Manual for details on how to extract a
pay period.
There is a large number of reports you can run. Here are three of the most
popular:
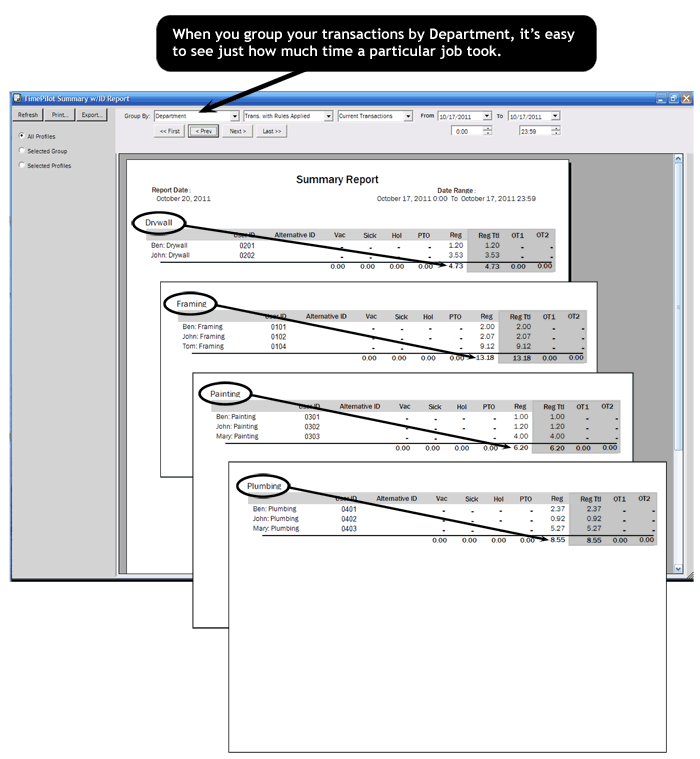
- 1. To see how many hours a particular job took, click the "Reports" menu item at
the top of the page, then "Summary Reports," then "Summary Report (w/IDs)…" When
the Summary Report appears, click on the "Group By" drop-down menu at the top of
the screen and change the view to "Department." Each Department—Framing,
Drywall, Painting and Plumbing—will be displayed on a separate page. See the
screenshot below for one day’s results.
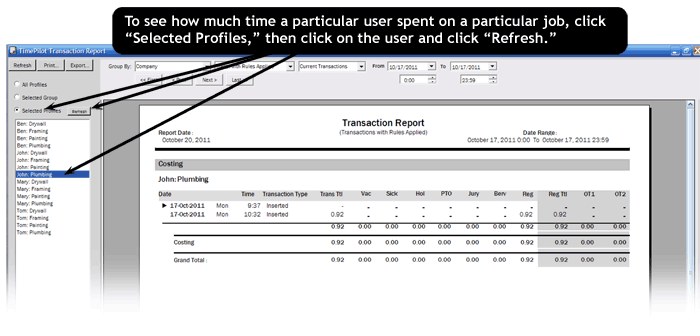
- To see details of the dates and times a particular employee spent on a
particular job, click "Reports," then "Transactions Reports." Click "Transaction
Report…" from the menu that appears. When the report appears, click "Selected
Profiles" at the left side of the screen. Click on the user’s name and then
click the "Refresh" button at the top of the column. See below for a screenshot.
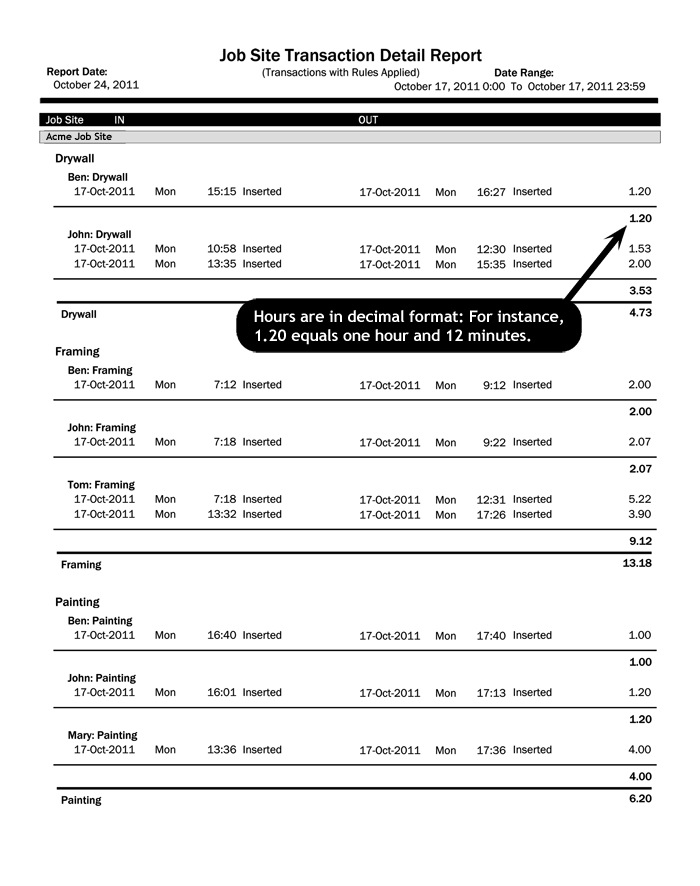
- If you have more than one TimePilot timeclock, you can run a Job Site Report
that will tell you the work that has been done at each location. To do so, click
the "Reports" menu, then "Job Site Report…" You can get exactly the look you
want by clicking the buttons at the left side of the screen ("All Profiles,"
"Selected Group" or Selected Job Sites") and using the drop-down menus at the
top of the screen. To get the big picture—a report that covers all employees and
all locations—click the "All Profiles" button on the left side of the screen.
The report is organized by site, with each site starting at the top of a page.
You can page through the report using the arrow buttons at the top of the
screen. On the next page is a screenshot of the first page of data from a
location called "Acme Job Site." If there were other sites, they would appear on
subsequent pages.