(Read the newsletter containing this article.)
The more you use the TimePilot Central software, the more you’ll find features and shortcuts that are built in. Here's one:
It’s not a bad idea to have your employees verify their work hours at the end of a pay period. This will give them a chance to correct any errors they spot as well as help protect you if an employee charges that they worked more hours than they were paid.
In TimePilot Central, you can create a report that can be printed out and then signed by the employee (and his or her supervisor, if you wish). Let’s say we want a report for all employees in the Shipping and Receiving Department, with signature lines for the employee and their supervisor indicating they agree with the hourly totals.
Here’s how to do it:
- Open your recently extracted pay period in TimePilot Central.
- Click the Reports menu at the top of the screen, then “Transaction Reports > Transaction Report (Condensed)”
A report showing every clock-in and clock-out by each employee, along with hours totaled, will be generated. That’s the basic report, listing the time data for every employee. We’re getting there, but it’s not quite perfect. Continue with the steps below to have the report show exactly what we want.
- Across the top of the screen, you’ll see that the default choices are to group the employees by Company, with Transactions with Rules Applied, for the full pay period. The dates and times for that pay period are also shown. (We won’t do this in this example, but if you needed a report covering different dates, you could click the “This Pay Period” field, choose “Custom” and enter that dates you want.)
First, let’s have the report organize the employees by Department, so we can break out those in Shipping and Receiving.
In the “Group By” field, click the arrow next to “Company” and choose “Department” from the choices that appear.

- To add signature lines for the employee and supervisor at the bottom of each employee’s report,
click the checkboxes for “Include Employee Signature Line” and “Include Supervisor Signature Line.”

Now we have the employees organized by Department, with signature lines for the employee and their supervisor appearing at the bottom of each employee’s data. But we want the report to include just the employees in Shipping and Receiving—not the entire company. Continue to the next step to refine things even more.
- In the left column, there are three choices that determine which employees will be displayed in the report:
- All Profiles: All employees will be shown.
- Selected Group: Clicking this button will give you a variety of choices, based on what you see in the “Group by” field in Step 3. For our example, you’ll click on “Shipping and Receiving” and then “Refresh.”
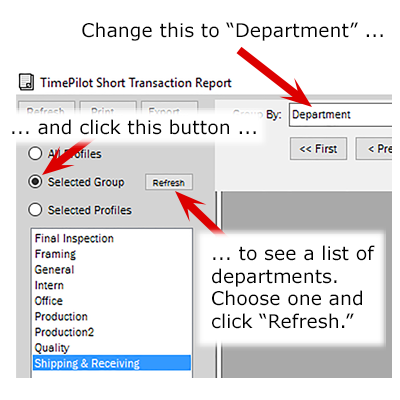
- Selected Profiles: Need a sheet for just a few employees?
You can click this button, choose the
employees you want, and click "Refresh."
- There! Now you have a report for each person in Shipping and receiving, listing all of their clock-ins and clock-outs, with lines at the bottom for signatures. Now all you have to do is print it.
- Click that “Print” button at the top of the screen to print the report. Want to save a copy in PDF format? Click the “Export” button, change the “Save as type” selection to PDF and click “Save.”
