
A. If you're running Version 4 or above of the TimePilot software (released in 2010), you'll be fine. Here's how to check your version:
A. The Vetro Time clock and Vetro Data Manager communicate over the local area network using the UDP communication protocol and ports 30303 and 30304. These ports must be open for Vetro to communicate over your Ethernet network. Please note: We cannot support your network; if you have questions about how to open these ports, please contact your network administrator.
A. Your product number is the first four digits of your registration number. You can find your registration number on a sticker attached to the printed warranty information that came with your product or (on older systems) on the inside front cover of your user manual.
A. No, you won't. The employee and transaction data won't be affected.
A: There are three things to check:
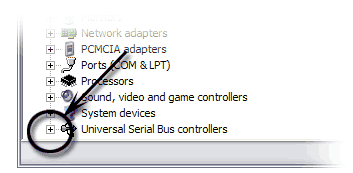
 Expand the "Universal Serial Bus controllers" by clicking on the + to the left of the words (see screenshot at right).
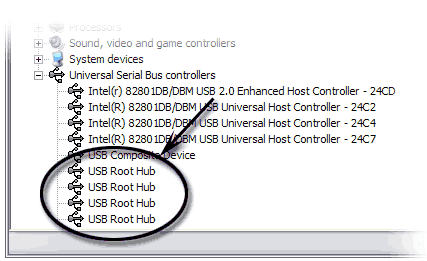
 Right-click on the first "USB Root Hub" item that appears (See screenshot at right) and choose "Properties" from the pop-up menu.
A. iButtons have a very long lifespan and are extremely durable. Though they may resemble a watch battery, they contain no power source to run down. They're guaranteed for 10 years, but we've found they usually last far beyond that time. However, like any other product, there is a chance (miniscule in our experience) one could be flawed. Here's how to test your iButtons:
A. The "--:--" is by design and not a problem. It's a signal to the employee that they have created an "exception." What this means is that at some point they did one of the following:
As a result, their transactions don't have the necessary alternating "IN" and "OUT" pattern. (The exception should also be spotted by a supervisor using the password-protected TimePilot Central in the TimePilot software. The software will display the employee's name in red.)
To make the correction, the supervisor will open TimePilot Central, view the employee's transactions and make the appropriate changes to restore the perfect in/out pattern. When the supervisor clicks the employee's name, just his or her transactions are displayed. In the list of transactions, clock-ins are identified by a red triangle to the left of the employee’s name; clock-outs are blank. A perfect set of transactions for an employee will have lines with a red triangle alternating with blank lines. TimePilot will display in red what it believes to be the incorrect transaction.
The clock will display the accumulated hours correctly the next time the employee clocks in.
A. TimePilot Central does not automatically refresh. To see any changes to the database, click on a different employee to display their transactions, and then click back on the original employee. Any new transactions should now be displayed.
Also, the On Site and Off Site buttons do not create a transaction in the database. To create transactions that are used to calculate time, the employee should use the In and Out buttons and not the On Site/Off Site buttons.
A. Check the pay period definition to make sure that the beginning and end of the pay period, including the time of day, are set correctly. To view the definition, start TimePilot Central, then click the "Setup" menu and choose "Company Setup."
Also, make sure that each employee is assigned to the correct company. When a pay period is extracted it removes transactions from the list of "Current Transactions" and places it in a separate file specific to a pay period and company. The removed transactions are now referred to a "Past Pay Period" or an "Extracted Pay Period."
A. Use TimePilot Central to check the employee's Pay Type and make sure that he or she qualifies for holiday, vacation or sick time. For example, if an employee is assigned a Pay Type that qualifies for holiday time, then any hours inserted either automatically or manually will be added to the "Regular Total" in the reports.
A. No, but you'll need to assign those employees the "No Shift" option when you're setting them up in the system (TimePilot Central > Setup > Profile Setup).
A. The Alternate ID field is used to associate employees set up in TimePilot with any ID numbering your company may already be using for the employees, such as within your accounting or payroll system. The ID is simply for your reference.
A. Uncheck the "Active" checkbox in the employee's profile. This will prohibit the employee from clocking in and out but will allow the employees' information to remain in the system for processing payroll. Marking in an employee "Inactive" is recommended over deleting an employee. If an employee is deleted, all past information associated with this employee will be disconnected.
A. First, you will need to make sure any transactions belonging to the iButton’s previous user are removed from your “Current Transactions.” This can be done by extracting your pay periods until all of those transactions are gone from Current Transactions. (Otherwise, TimePilot won’t know whether a transaction belonged to the old user or the new user.)
When all of the former employee's transactions are out of Current Transactions, you can delete the iButton number from that employee's profile (or delete his or her profile altogether), freeing up the iButton. Then you can assign the iButton to another employee, just as if it's a new one.
The procedure for adding employees varies by TimePilot system; for instructions for your product, please visit the software's help files, which are available under the "Help" menu in TimePilot Central or under your product's listing in our web site's Support Center.
A. This is commonly done when an employee loses their iButton. The process varies, depending upon which TimePilot product you use:
A. Yes, you can modify transactions just as you could before you extracted.